Welcome to another Hack the Box challenge. In this walkthrough, I have documented how I owned the Cap machine on Hack The Box. Hack The Box is a cybersecurity platform that helps you bridge knowledge gaps and prepares you for cyber security jobs.
You can also test and grow your penetration testing skills, from gathering information to reporting. If you are new to this blog, please do not forget to like, comment and subscribe to my YouTube channel and follow me on LinkedIn for more updates.About the Machine
The HTB Cap machine is an easy-level Linux machine with an HTTP server that allows users to capture non-encrypted traffic. It provides opportunities to exploit vulnerabilities, including an insecure direct object reference (IDOR) on its website. The capture contains plaintext credentials and can be used to gain foothold. A Linux capability is then leveraged to escalate to root.
About the Vulnerability
Cap HTB machine has two security flaws. One, is a website with an insecure direct object reference (IDOR) vulnerability, that stores a Wireshark packet file and also allow you to view and download other users Wireshark packet file by editing the URL header. This vulnerability allow users of the website access FTP credentials of other users, thereby allowing SSH access as that user.
How to pwn the machine
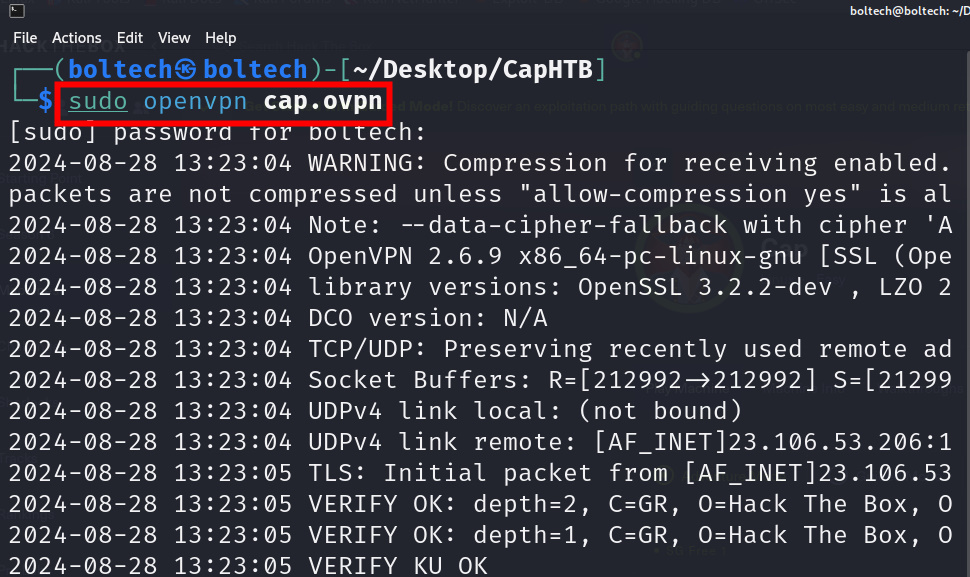
Like every other machine, the first step is downloading the lab access file on Hack the Box and connecting Kali Linux terminal to Hack the Box server by running the following command in Kali Linux terminal:
After connecting Kali Linux terminal with Hack the Box server, the next step was performing Nmap enumeration to find open ports that are available on the host machine by running the following commands in the terminal:
I found three ports open on the targets machine, which includes 21/tcp, 22/tcp and 80/tcp. Once, the nmap scan has been successfully completed, the next step was adding the IP address of the cap machine to the /etc/hosts file by running the following commands in the terminal:
Once I have added this to the /etc/hosts file, to save the file, I pressed and hold Ctrl + X to save, press Y to modify the buffer and X to exit. Next, I visited 10.10.10.245 on my browser and I was redirected to the security dashboard of the cap machine.
I navigated my way around the dashboard, looking for vulnerabilities that I could exploit, but I couldn’t find any. I stumbled upon an interesting thing on the Security Snapshot tab, I noticed that the path in the URL includes a number at the end. I changed the value of this number several times and discovered some changes in the data (Number of Packets, IP Packets, TCP Packets, and UDP Packets).
Initially in the URL bar of the security snapshot is the following URL 10.10.10.245/data/8, I changed the value of the last character (8) to 7, 6, 5, 4, 3, 2, 1, and 0. I noticed an increase in the number of data types for Number of Packets, IP Packets, TCP Packets, and UDP Packets.
After changing the URL to 10.10.10.245/data/0, I clicked on the “Download” button to download the Wireshark file on my Kali Linux. Then, I opened the Wireshark file by running the following command in my terminal:
This launched the Wireshark interface and I filtered my pane by switching to the “Hash” pane area which shows a hexadecimal representation of the packet’s contents, allowing for quick verification and comparison.
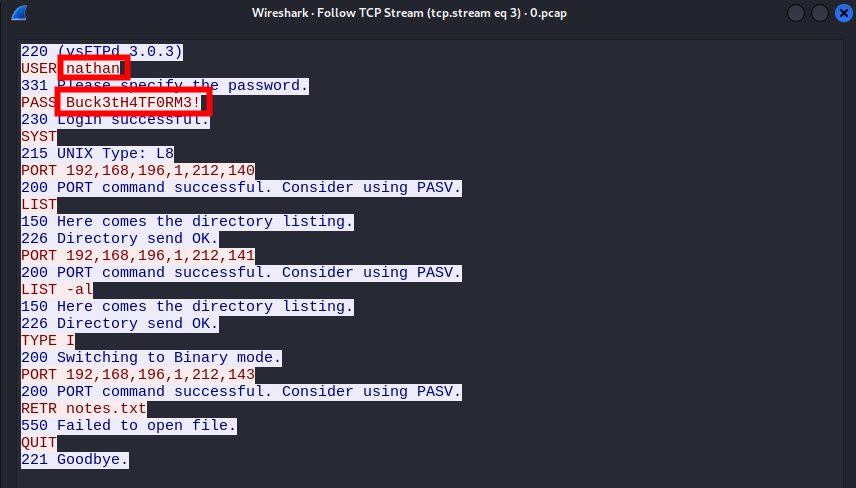
I found a request with a PASS header value of Buck3tH4TF0RM3! which looks suspicious. I right clicked and chose “follow” and clicked on “TCP Stream”
This opened the request in a text editor and I found the following credentials (user: Nathan and password: Buck3tH4TF0RM3!)
Once I had copied the password, the next step was obtaining a secure encrypted connection to user Nathan by typing the following command on the terminal:
I pasted the password of user Nathan from the Wireshark file I analyzed as Buck3tH4TF0RM3! and it worked. I got a shell as user Nathan. Like I always do, I listed all the files in the directory by running the ls command and there I found the user.txt file. To read the content of the file, I ran the cat command and there I got my user flag!
Hurray, I got the user flag!!!
The next step was obtaining the root user flag. Firstly, I tried some privilege escalation but none of it worked. Then I tried to locate some files with specific permissions on a Linux system by running the following command:
-perm /4000 specifies that the command should search for files with the execution bit set (4) and the read and write bits for owner (2) and group (0). The 2>/dev/null part redirects any error messages to the null device, suppressing them from the output. The find command searches the root directory (/) and its subdirectories for files matching the specified criteria, printing the absolute path of each matching file to the console.
Afterwards, I created a Python file that allows me to run sudo (admin) privileges by creating a file called exploit.py
To create the file, I ran the following command in my terminal:
This opened the GNU interface, then I pasted the following lines of code inside to gain privilege into the system.
I pressed and hold Ctrl + X, then press Y and Enter to save the file. Next, I ran the exploit.py file against python by running the following command:
This command executed the exploit.py file and I was able to obtain the shell at root. Next I listed all the files and couldn’t find the flag, then I changed the folder to root and listed all the files in the directory, there I found the root .txt file.
To read the content of the file, I ran the cat root.txt and there I got my flag.
That’s how I got the root flag. If you enjoy reading my writeup and would love to see more of it, kindly consider subscribing to my YouTube channel and following me on my other social media accounts.
Subscribe to my YouTube channel: https://www.youtube.com/@BoltechTechnologies1
Follow me on LinkedIn: https://www.linkedin.com/in/isiaq-ibrahim-468588156/
Follow me on Twitter: https://x.com/Isiaq_Ibrahim99
Follow me on Twitter: https://x.com/BoltechNG
Follow me on Medium: https://medium.com/@ibrahimbolaji50.ib
This walkthrough was first published on Medium on August 31st 2024. The walkthrough had 27 views and 15 reads on Medium and 1,999 views on YouTube.


0 Comments